How to use Make to automate your content workflow


Make lets you connect apps into automated sequences called scenarios, so publishing a blog post can automatically trigger an email newsletter, a social media post, and a Notion content log without you touching any of those platforms individually. This guide walks through building that exact workflow from scratch, covering every step in Make's visual editor from your first module to a live, tested scenario.
How Make scenarios work before you build anything
A Make scenario is a chain of modules. Each module represents one action in one app: "watch for a new RSS item", "send an email", "post to a social scheduler". Modules connect left to right. The leftmost module is the trigger, which starts the scenario. Every module after it runs in order, receiving data from the step before it.
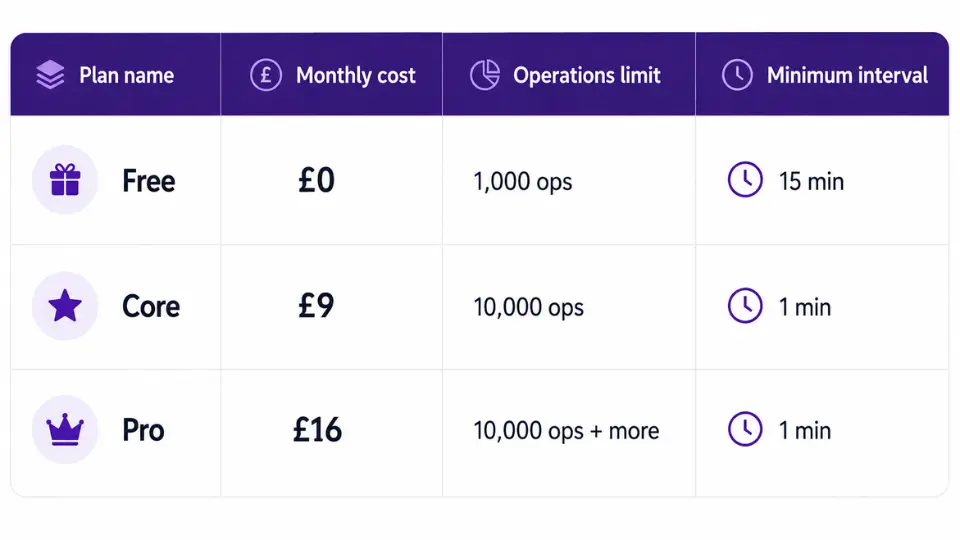
Make runs scenarios on a schedule you set, from every 15 minutes on the free plan to every minute on paid tiers. The free plan gives you 1,000 operations per month, where each module execution in a scenario counts as one operation. A 5-module scenario processing 10 new blog posts in one run uses 50 operations. Plan your module count against your publishing frequency before choosing a plan.
Before opening Make, gather the following:
- Your blog's RSS feed URL (most WordPress, Webflow, and Ghost sites generate one automatically at /rss or /feed)
- Login credentials for your email tool (Mailchimp, Kit, or similar)
- Login credentials for your social scheduler (Buffer or Hootsuite)
- A Make account (the free plan is sufficient to build and test this)
Setting up your first Make scenario
Log into Make and click "Create a new scenario" from the dashboard. You land on the scenario editor, a blank canvas with a large plus icon in the centre. Click it to add your first module.
Search for "RSS" and select the RSS app, then choose "Watch RSS feed items" as the trigger. Paste your blog's RSS feed URL into the Feed URL field. Set "Maximum number of results" to 1 for testing purposes. You can increase this later. Click OK to save the module.
Make will ask you to choose where the scenario should start processing from: all existing items, or only new ones added after today. Select "From now on" to avoid reprocessing old posts when you first activate the scenario.
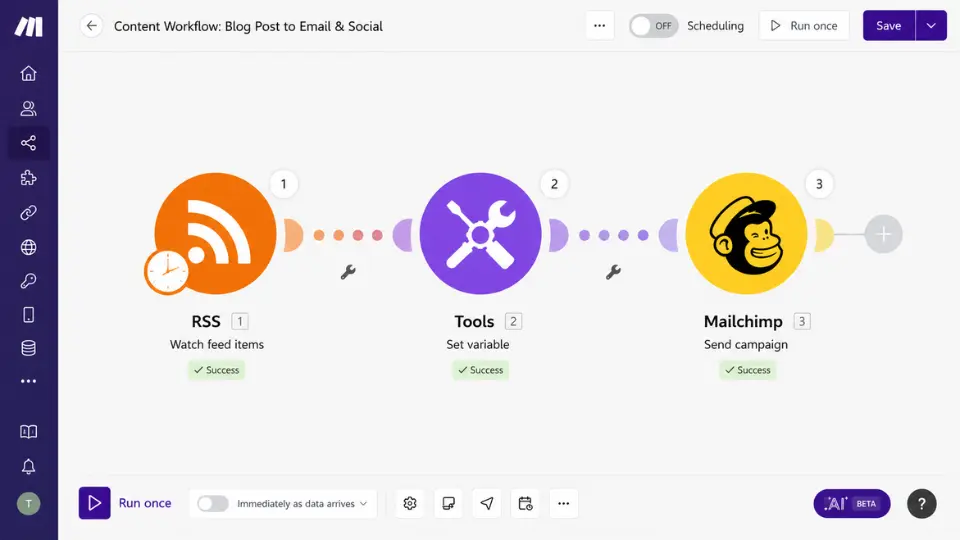
You now have a trigger. Every time Make runs this scenario, it checks your RSS feed for new items published since the last run. If it finds one, it passes that item's data (title, URL, description, publish date) to the next module in the chain.
Mapping your RSS data for use in later modules
Click the plus icon to the right of your RSS module to add a second module. Before connecting your email or social tools, add a "Tools" module using the "Set variable" action. This is optional but recommended: it lets you define a clean post summary once and reuse it across multiple downstream modules without reformatting the data each time.
In the variable field, write a short template using Make's mapping panel. Click the RSS module's output fields on the right-hand panel and drag "Title" and "URL" into your variable value. A basic version looks like: [Post title] — Read it here: [Post URL]. Name the variable something descriptive, such as "post_summary". Every module downstream can now reference this variable instead of re-mapping raw RSS fields.
Connecting Make to your email tool for automated newsletters
Add a new module after your variable setter. Search for your email platform (Mailchimp, Kit, or whichever you use) and select the action that creates or sends a campaign. For Mailchimp, this is "Create a Campaign" followed by a second module to "Send a Campaign". For Kit, a single "Create and Send a Broadcast" module handles both steps.
Connect your account by clicking "Add" next to the connection field and following the OAuth flow. Make stores the connection securely so you do not need to re-authenticate each time the scenario runs.
Map your variable into the email subject and body fields. A typical setup:
- Subject line: map your RSS title field directly
- Body: use your post_summary variable plus a call to action linking to the post URL
- Send to: select your subscriber list from the dropdown (Make fetches your lists automatically once the account is connected)
One important limitation here: Make cannot dynamically generate the full HTML design of an email. It can populate a pre-built template with content, but you need to have created that template in your email tool first. In Mailchimp, build a template with merge tags where your title and body content should appear, then reference that template ID in Make. Kit handles this differently, generating plain-text broadcasts directly from the body field you map.
Connecting Make to a social media scheduler
Add another module after your email step. Search for Buffer and select "Create an Update". Connect your Buffer account, select the social profiles you want to post to, and map your post_summary variable into the text field. Buffer accepts multiple profiles in one module, so you can post to LinkedIn, X, and Instagram in a single step.
If you use Hootsuite instead, the process is identical but uses Hootsuite's "Create Message" module. One practical difference: Buffer schedules posts to your pre-set queue by default, while Hootsuite requires you to specify a send time. For content workflows where you want posts to go out at optimal times rather than immediately, Buffer's queue approach is simpler to manage inside Make.
At this point your scenario chain looks like: RSS trigger, Set variable, Send email, Post to social. Test it before adding anything else. Make's built-in "Run once" button at the bottom of the editor runs the scenario immediately using real data, showing you each module's input and output so you can verify the mapping is working correctly.
Adding a filter to prevent duplicate posts
By default, Make tracks which RSS items it has already processed and will not reprocess them. This built-in deduplication is reliable for most setups. However, if your CMS re-publishes updated posts with the same URL, Make may send a second newsletter and social post for a revision rather than a new article.
To prevent this, add a filter between your RSS trigger and your first action module. Click the dotted line connecting the two modules and select "Set up a filter". Add a condition: "Publish date is greater than [date of your last run]". This ensures only genuinely new posts pass through. Make's date-handling functions let you calculate this dynamically without hardcoding a date.
A related limitation worth knowing: Make does not natively deduplicate across scenario runs if you are watching a feed that republishes items with updated timestamps. In that case, pairing Make with a data store module (available on paid plans) lets you log processed URLs and filter against them on each run.
Scheduling and activating your Make content scenario
With your modules connected and tested, click the scheduling toggle at the bottom of the editor to set how often Make checks your RSS feed. The free plan supports a minimum interval of 15 minutes. The Core plan (£9 per month) drops this to 1 minute and raises your operation limit to 10,000 per month, which is more than enough for a typical content team publishing daily.
Click the on/off toggle to activate the scenario. Make begins running it on the schedule you set. You can monitor each run in the scenario's history panel, which shows a log of every module execution, the data that passed through, and any errors encountered.
Where Make falls short for content workflows
Make handles structured, predictable data well. It struggles when content workflows involve decisions that require context. It cannot read a blog post and decide whether the tone suits your LinkedIn audience differently from your email list. It cannot generate a social post caption from scratch without connecting an AI module like ChatGPT, which adds both cost and an extra point of failure.
The free plan's 15-minute polling interval also creates a visible delay between publishing and distribution. For time-sensitive content, that gap matters. Paid plans solve the timing issue, but at that point the cost comparison with Zapier becomes relevant. Zapier's starter plan costs £19.99 per month for 750 tasks, while Make's Core plan at £9 per month gives you 10,000 operations. For workflows where each trigger activates multiple modules, Make's operation model almost always works out cheaper at scale.
n8n is the third option worth mentioning for technical users. It is open source, self-hostable, and has no per-operation limits on the self-hosted version. The trade-off is setup complexity: n8n requires a server to run on, and its interface is less beginner-friendly than Make's. For a solo creator or small content team, Make is the better starting point. For a developer-led team that wants full control and no usage caps, n8n is worth the additional setup time. For a broader comparison of these tools, the workflow automation guide covers the category in more depth.

Extending the scenario once it is running
The workflow above covers the core loop. Once it is stable, three extensions are worth adding. First, connect Airtable or Notion as a logging module at the end of the chain, so every published post is automatically recorded with its title, publish date, and social post text. Second, add an error handler to your scenario using Make's "Error handler" route, which sends you an email notification if any module fails rather than silently dropping the run. Third, build a second scenario for repurposing: watch your Airtable log for posts older than 30 days, generate a "throwback" social post, and queue it in Buffer. That single addition keeps your social channels active without any manual effort.
The content workflow described here takes around an hour to build and test end to end. The free plan is sufficient to run it if you publish fewer than 10 posts per month. Above that volume, the Core plan at £9 per month covers most content teams comfortably. The marketing automation platforms guide covers how Make sits alongside broader automation tools if you are deciding where it fits in your stack.
More AI & Tech Blogs





Latest AI & Tech Blogs


Subscribe to Stay in the loop
Get the latest AI and technology news, honest tool reviews, and practical guides delivered straight to your inbox.
Success! Check your Inbox!

Tezons Newsletter
The latest technology news, in-depth tool reviews, and practical guides - curated and delivered to your inbox.
Latest News




Have a question?
Have any questions?
Didn’t find what you were looking for? We’re just a message away.